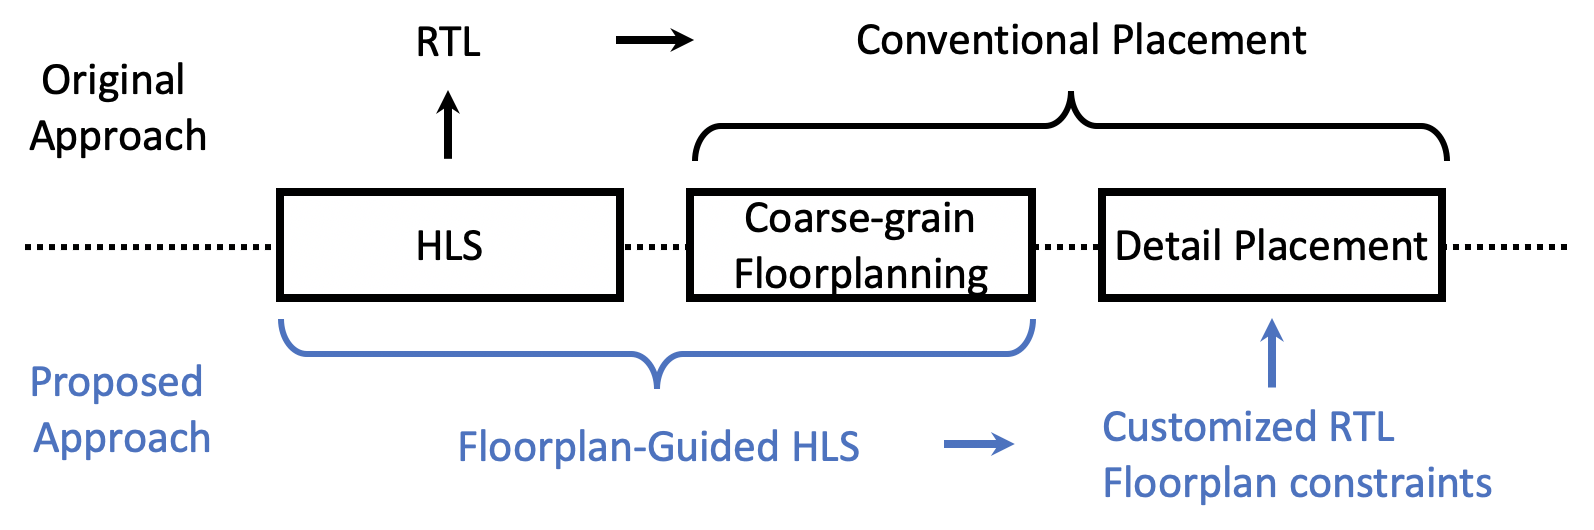
This section covers the usage of AutoBridge in TAPA.
AutoBridge is an automated floorplanning and pipelining tool for HLS designs. By leveraging the high-level design hierarchies, it produces coarse-grained floorplans so that SLR crossing do not bottleneck the clock frequency of an HLS kernel. This is natively integrated with TAPA.
Supported Devices
While TAPA supports any Xilinx FPGA device, the floorplanning plug-in only supports the Xilinx Alveo U250 and U280 FPGAs. Specifically, the tool has been tested on Vitis version xilinx_u250_xdma_201830_2 and xilinx_u280_xdma_201920_3.
Feel free to contact us for support of other devices.
Note that the methodology works on large devices (like UltraScale+).
Note
You can still use TAPA for other platforms without the floorplanning step.
Introduction to AutoBridge
The key idea of AutoBridge is that it utilizes the pipelining flexibility of data flow designs.
To relieve local congestion, AutoBridge tries to spread the logic evenly across the entire device.
To resolve global critical paths, AutoBridge adds additional pipelines to the latency-insensitive interfaces between tasks.
This figure visualizes the difference in the final bitstream with or without AutoBridge.
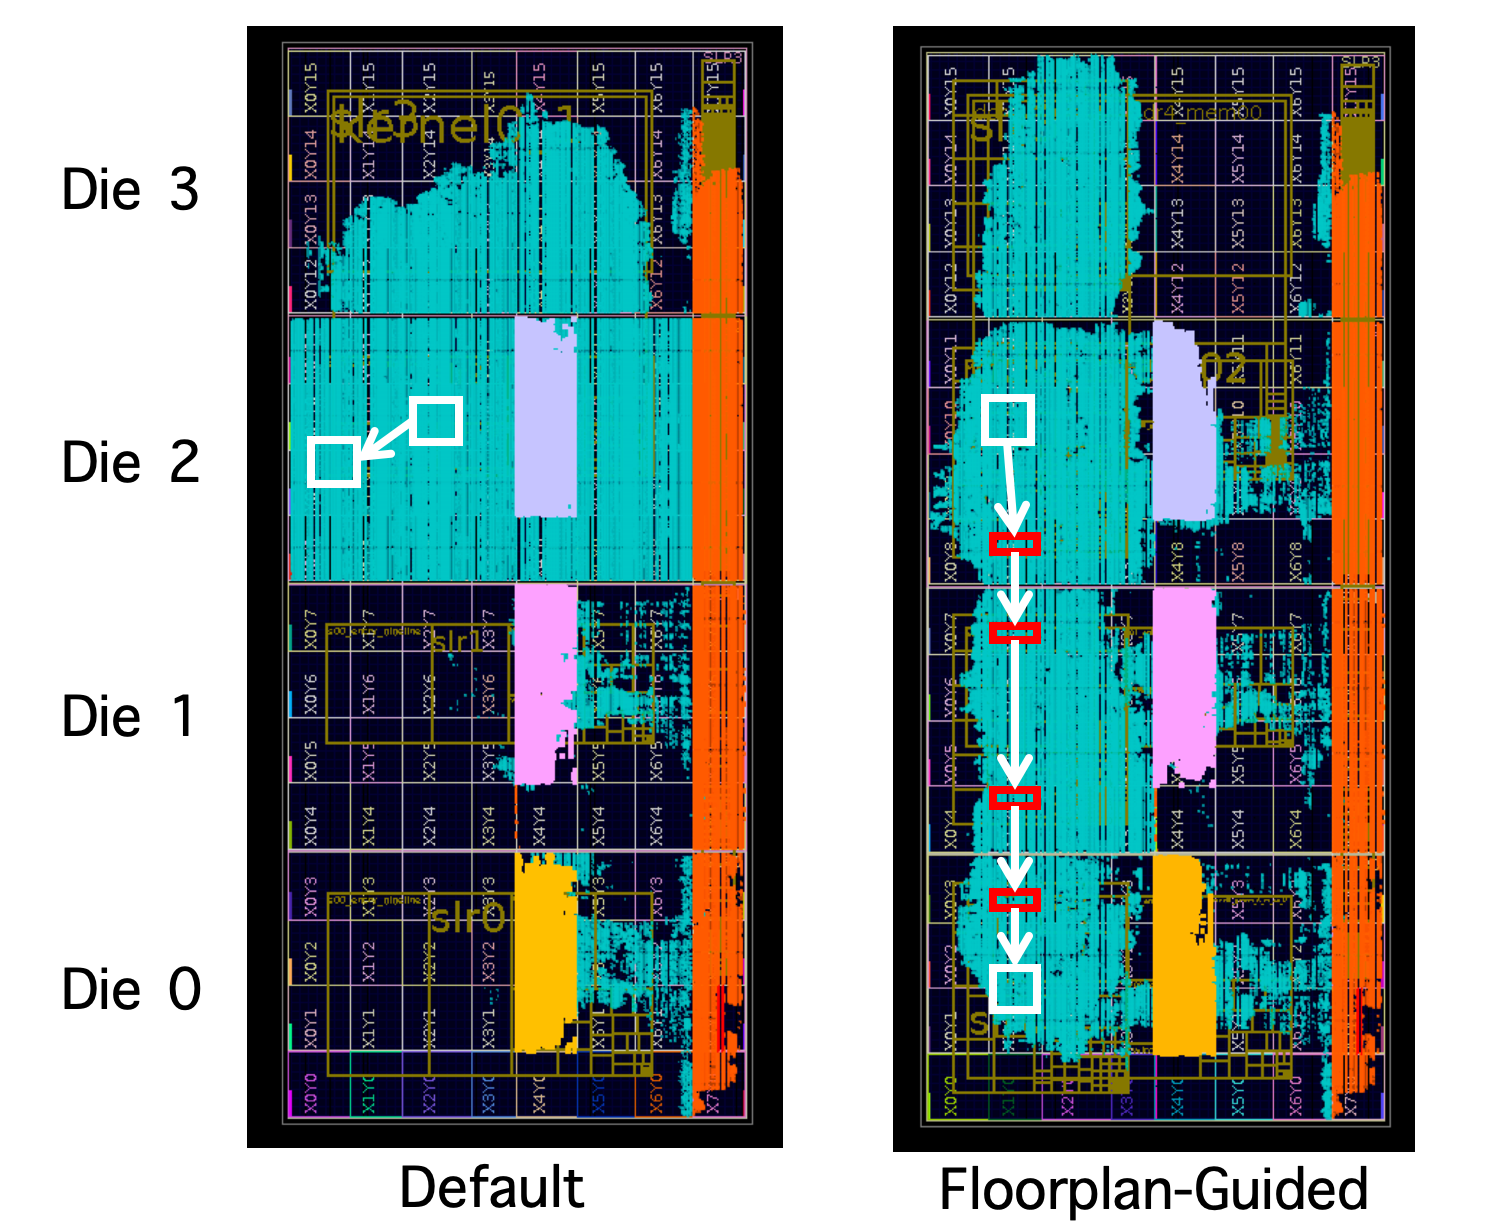
It shows a CNN accelerator implemented on the Xilinx U250 FPGA. It interacts with three DDR controllers, as marked in grey, pink, and yellow blocks in the figure. In the original implementation result, the whole design is packed close together within die 2 and die 3. To demonstrate our proposed idea, we first manually floorplan the design to distribute the logic in four dies and to avoid overlapping the user logic with DDR controllers. Additionally, we pipeline the FIFO channels connecting modules in different dies as demonstrated in the figure. The manual approach improves the final frequency by 53%, from 216 MHz to 329 MHz.
Basic Usage
When running tapac, add the --enable-floorplan option and specify the output constraint file with the --floorplan-output option.
tapac -o vadd.$platform.hw.xo vadd.cpp \
  --platform $platform \
  --top VecAdd \
  --work-dir vadd.$platform.hw.xo.tapa \
  --enable-floorplan \
  --floorplan-output constraint.tcl
AutoBridge needs to know how the AXI interfaces bind to the physical ports, thus the user need to provide a
connectivity configuration file through the --connectivity option:
tapac -o vadd.$platform.hw.xo vadd.cpp \
  --platform $platform \
  --top VecAdd \
  --work-dir vadd.$platform.hw.xo.tapa \
  --enable-floorplan \
  --floorplan-output constraint.tcl \
  --connectivity connectivity.ini
Here is an example of the connectivity file. The syntax is the same as required by the Vitis workflow:
[connectivity]
sp=VecAdd.a:DDR[0]
sp=VecAdd.b:DDR[1]
sp=VecAdd.c:DDR[2]
AutoBridge will generate a .dot representation of how your tasks and streams are connected. You could generate a figure from it online, for example at GraphvizOnline. Here is an example of the vadd application.
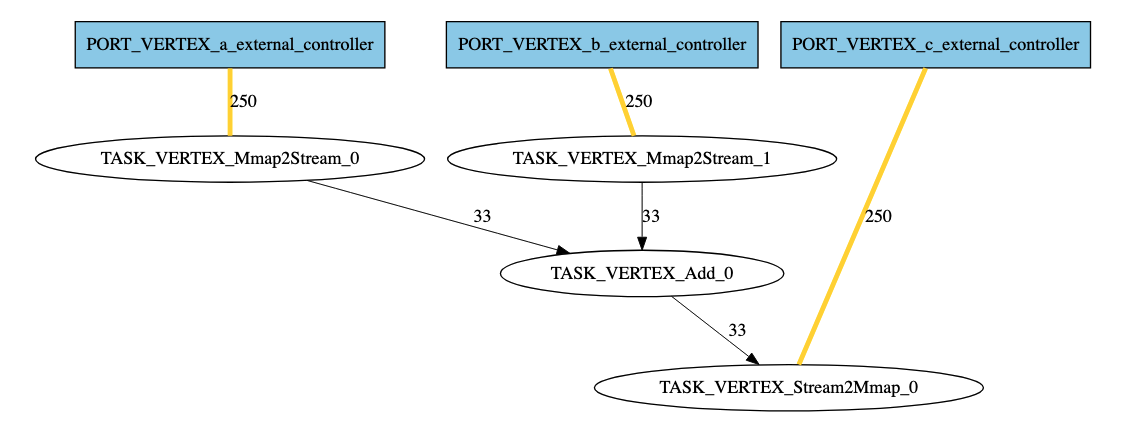
Blue boxes represent external memory ports. The number beside each edge represents its width.
Improve Floorplan Quality
By default, AutoBridge uses the resource estimation from HLS report.
This can be fairly inaccurate (especially for LUT and FF) and affect the QoR.
TAPA can be configured to use RTL synthesis result for each task instance by the --enable-synth-util option.
This option instructs TAPA to run logic synthesis of each task to get a more accurate resource usage, thus improving the quality of the floorplanning results.
tapac -o vadd.$platform.hw.xo vadd.cpp \
  --platform $platform \
  --top VecAdd \
  --work-dir vadd.$platform.hw.xo.tapa \
  --enable-floorplan \
  --floorplan-output constraint.tcl \
  --connectivity connectivity.ini \
  --enable-synth-util
Note
Tasks are synthesized in parallel for the post-synthesis area report. Still, this step could takes a while as RTL synthesis is much slower than C synthesis. By default, tapac will invoke 8 parallel Vivado processes to synthesize each task. You could allow more processes through the --max-parallel-synth-jobs option, though you should be careful to not run out of memory.
If an external memory port is only read from or only written to, you should mark it through the --read-only-args and --write-only-args options. They will help improve the floorplan quality. Those options accept regular expressions representing multiple ports. In the example shown below, ports whose names match the pattern example_arg_hbm_[0-3] will be marked as read-only, while ports my_out_port_foo and another_out_port_bar will be marked as write-only. Note that the arguments here are just for demonstration, you need to replace them by your own argument names.
tapac -o vadd.$platform.hw.xo vadd.cpp \
  --platform $platform \
  --top VecAdd \
  --work-dir vadd.$platform.hw.xo.tapa \
  --enable-floorplan \
  --floorplan-output constraint.tcl \
  --connectivity connectivity.ini \
  --enable-synth-util \
  --read-only-args "example_arg_hbm_[0-3]" \
  --write-only-args "my_out_port_foo" \
  --write-only-args "another_out_port_bar" \
Automatic HBM Channel Binding
The Alveo U280 HBM boards have 32 HBM channels and Vitis users have to manually bind each top level argument to one physical channels. Be careful with the connectivity file. An inferior port binding will cause unnecessary routing congestion. Especially for U280 users, since all the 32 HBM channels are placed on the bottom SLR. To address this issue, AutoBridge could automatically search for the optimal binding in the floorplan process.
tapac -o vadd.$platform.hw.xo vadd.cpp \
  --platform $platform \
  --top VecAdd \
  --work-dir vadd.$platform.hw.xo.tapa \
  --enable-floorplan \
  --floorplan-output constraint.tcl \
  --connectivity connectivity.ini \
  --enable-synth-util \
  --read-only-args "hbm_[0-3]" \
  --write-only-args "my_out_port" \
  --write-only-args "another_out_port" \
  --enable-hbm-binding-adjustment \
Note
AutoBridge treats each HBM channel as independent and equivalent and does not consider the complex internal micro-architecture of the HBM module.
Get Best Results with Multi-Floorplanning
The floorplanning process is about the tradeoff between two factors:
Area limit: the maximal percentage of occupied resources in each slot
SLR crossing limit: the maximal number of wires crossing an SLR boundary
Very often it is infeasible to tell which factor is more important for a given design. To obtain the best timing quality, we could generate all pareto-optimal floorplan choices. We place and route all of them in parallel and use the one with the highest frequency.
To do that, add the --run-floorplan-dse option. TAPA will generate a set of floorplan projects named run-1, run-2, … and there will be an script in each project to invoke v++.
tapac -o vadd.$platform.hw.xo vadd.cpp \
  --platform $platform \
  --top VecAdd \
  --work-dir vadd.$platform.hw.xo.tapa \
  --enable-floorplan \
  --floorplan-output constraint.tcl \
  --connectivity connectivity.ini \
  --enable-synth-util \
  --read-only-args "hbm_[0-3]" \
  --write-only-args "my_out_port" \
  --write-only-args "another_out_port" \
  --enable-hbm-binding-adjustment \
  --run-floorplan-dse \
Note
When you run multiple Vivado processes for different floorplanning, be careful of how much memory you have. A rule of thumb is that for a large design (say with over 50% resource usage) Vivado uses around 40 GB of memory in its peak.
Adjust the Floorplan Parameters (Experts Only)
All important floorplan parameters are adjustable by the users.
Area limit: the maximal percentage of occupied resources in each slot
SLR crossing limit: the maximal number of wires crossing an SLR boundary
Given a specific area limit and an SLR crossing limit, AutoBridge assigns each task to one slot such that minimize the total wire length. By default, AutoBridge will empirically select an area limit and an SLR crossing limit within an acceptable range.
You could manipulate AutoBridge through the following options:
--min-area-limitand--max-area-limitspecify the range of acceptable area limit that AutoBridge chooses from.--min-slr-width-limitand--max-slr-width-limitspecify the range of acceptable SLR crossing limit that AutoBridge chooses from.--floorplan-opt-prioritycontrols the priority between the two factors. By default, AutoBridge takes priority in selecting a smaller area limit (AREA_PRIORITIZED). You could change it by providing theSLR_CROSSING_PRIORITIZEDoption.
Manual Floorplanning (Experts Only)
You could enforce the tool to assign certain task instances to specified slots. To do this, use the --floorplan-pre-assignments option to provide a json file that includes the manual floorplanning.
A common use case is to reproduce the floorplan step of a previous run. In each time, AutoBridge will generate a
floorplan-region-to-instances.jsonthat records the entire floorplan results. If you simply provide this file from a previous run, then you are essentially reproducing the previous run.This step requires you to know some lower level information of the device.
Here is an example json file.
CR_X0Y0_To_CR_X3Y3stands for “the rectangle region determined by CLOCKREGION_X0Y0 and CLOCKREGION_X3Y3”. Assume that the taskfoois invoked twice, this json assigns the first invoked instanceTASK_VERTEX_foo_1toCR_X0Y0_To_CR_X3Y3and the second invoked instance toCR_X4Y8_To_CR_X7Y11.
{
  "CR_X0Y0_To_CR_X3Y3": [
    "TASK_VERTEX_foo_1",
    "TASK_VERTEX_bar"
  ],
  "CR_X4Y8_To_CR_X7Y11": [
    "TASK_VERTEX_foo_2",
    "TASK_VERTEX_taz"
  ]
}
Scalability
AutoBridge has been tested on designs from <20 tasks to designs with >1000 tasks. Here are some tips if you have more than hundreds of tasks:
Install the Gurobi solver. Gurobi is free for academia, and the registration process takes less than 5 minutes. See instructions here.
By default, AutoBridge searches for optimal solutions globally. However, if the process could not finish within a reasonable time, try adding the
--floorplan-strategyoption withQUICK_FLOORPLANNING. Empirically, designs with hundreds of tasks may need to run in this strategy, but the situation varies a lot based on how the tasks are connected.By default, each solving process is allowed for 600 seconds. You could adjust the threshold by the
--max-search-timeoption.
Tips to Improve Frequency
A general rule of thumb is to write smaller tasks, which allows more flexibility in the floorplanning process.
Smaller tasks also has less control broadcast. In general, Vitis HLS will generate a centralized controller for the entire task. If your task is too large, the controller will have a high fanout that will cause routing congestion. Checkout our DAC 2020 paper that studies this problem. The pipeline optimization technique has been realized in Vitis HLS as the
frppipeline style (e.g.,#pragma HLS pipeline II=1 style=frp), which trades area for less control signal fanout.Modify the AutoBridge parameter and generate multiple bitstream at the same time. When it comes to the tradeoff between area limit and wire number, it is hard to judge which design point is better, so we may need to run multiple points on the pareto-optimal curve.
Currently, AutoBridge can only handle the top-level hierarchy. Lower-level hierarchies are not visible to AutoBridge and are treated as a whole. You may need to take this into consideration when designing the kernel. This limitation is expected to be addressed soon.
AutoBridge will generate a
.dotfile that helps you visualize the topology of your design.
How to Find Post-Routing Critical Paths
By default, the auto-generated v++ script will save all intermediate checkpoints. To look for the post-routing checkpoint, you could try:
find . -name "*route*dcp"
You could use Vivado to open the checkpoint in a GUI environment:
vivado $path_to_dcp
Then you could follow Vivado guidelines to analyze the placement/routing results and debug potential issues.
Feel free to contact the TAPA team if the final frequency is unsatisfactory.